例程讲解-08-face_eye_detection人眼追踪
视频教程17 - 人眼识别和瞳孔追踪:https://singtown.com/learn/50025/
本例程为 08-Eye_Tracking-face_eye_detection
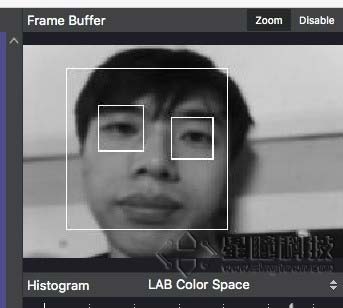
本例程先用haar算子进行人脸识别,然后利用haar算子找到人脸中的眼睛,实现人眼追踪。
# 人眼追踪例程
#
# 该脚本使用内置的前脸检测器来查找脸部,然后查找脸部的眼睛。如果你想确定
# 眼睛的瞳孔,请参阅iris_detection脚本,了解如何做到这一点。
import sensor, time, image
#重置传感器
sensor.reset()
#传感器设置
sensor.set_contrast(1)
sensor.set_gainceiling(16)
sensor.set_framesize(sensor.HQVGA)
sensor.set_pixformat(sensor.GRAYSCALE)
# 加载Haar算子
# 默认情况下,这将使用所有阶段,较低的阶段更快但不太准确。
face_cascade = image.HaarCascade("frontalface", stages=25)#人脸识别的haar算子
eyes_cascade = image.HaarCascade("eye", stages=24)#眼睛的haar算子
#image.HaarCascade(path, stages=Auto)加载一个haar模型。haar模型是二进制文件,
#这个模型如果是自定义的,则引号内为模型文件的路径;也可以使用内置的haar模型,
#比如“frontalface” 人脸模型或者“eye”人眼模型。
#stages值未传入时使用默认的stages。stages值设置的小一些可以加速匹配,但会降低准确率。
print(face_cascade, eyes_cascade)
# FPS clock
clock = time.clock()
while (True):
clock.tick()
# Capture snapshot
#捕获快照
img = sensor.snapshot()
# Find a face !
# Note: Lower scale factor scales-down the image more and detects smaller objects.
# Higher threshold results in a higher detection rate, with more false positives.
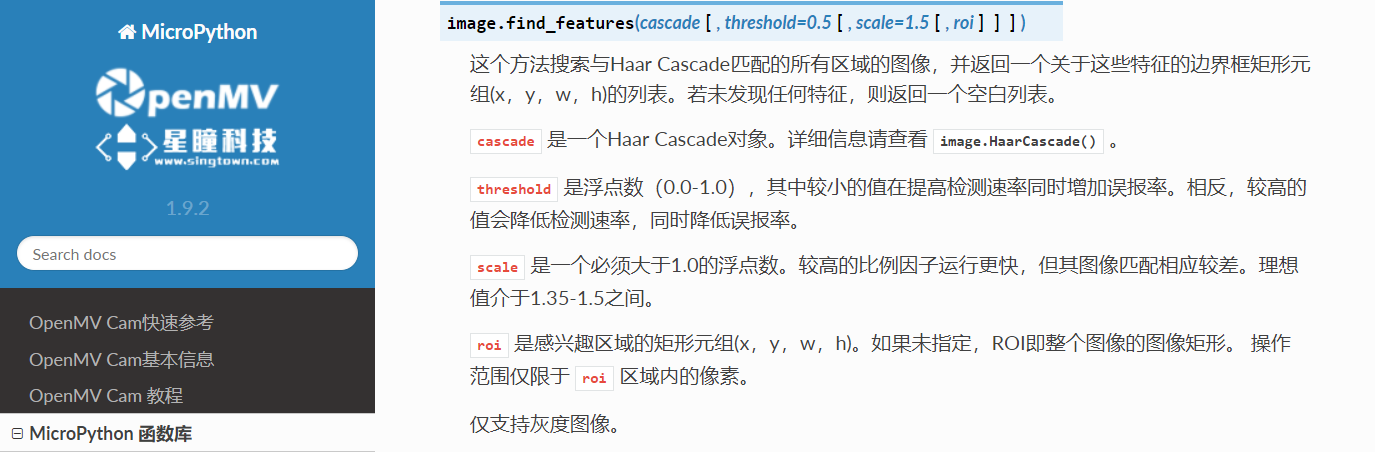
objects = img.find_features(face_cascade, threshold=0.5, scale=1.5)
# 先利用haar算子找到视野中的人脸。image.find_features(cascade, threshold=0.5, scale=1.5),thresholds越大,
# 匹配速度越快,错误率也会上升。scale可以缩放被匹配特征的大小。
# Draw faces
#将找到的人脸用矩形标记出来
for face in objects:
img.draw_rectangle(face)
# Now find eyes within each face.
# 现在找出每一张脸的眼睛。
# Note: Use a higher threshold here (more detections) and lower scale (to find small objects)
# 注意:这里使用更高的阈值(更多的检测)和更低的尺度(寻找小物体)
eyes = img.find_features(eyes_cascade, threshold=0.5, scale=1.2, roi=face)
#在人脸中识别眼睛。roi参数设置特征寻找的范围,roi=face即在找到的人脸中识别眼睛。
#将找到的眼睛标记出来
for e in eyes:
img.draw_rectangle(e)
# 打印FPS。
# 注意:实际FPS更高,流FB使它更慢。
print(clock.fps())
运行程序效果如图: