pyb各种外设
600倍AI算力提升,480+FPS彩色全局快门,120+FPS YOLO目标检测,200+FPS FOMO目标检测!
星瞳科技2026最新款OpenMV N6高性能AI智能图像识别摄像头正式开售啦!
快来了解详情~:
淘宝 星瞳科技OpenMV品牌店:https://item.taobao.com/item.htm?ft=t&id=1029138529714
天猫 OpenMV旗舰店:https://detail.tmall.com/item.htm?id=1028359546575
京东 星瞳旗舰店: https://item.jd.com/10212563443894.html
支持AI大模型及Agent协同;
标配480FPS百万像素彩色全局快门,可拍摄识别超高速运动物体;
120+FPS YOLO目标检测,高速运行复杂AI算法,支持语音识别;
内置WiFi、蓝牙5.1、以太网、麦克风、IMU;
内置H264和JPEG编码硬件加速,支持MP4录像及网络推流;
配套官方机械臂、无人机、智能车、云台等套件,还有竞赛支持,一键复制代码运行!
概览
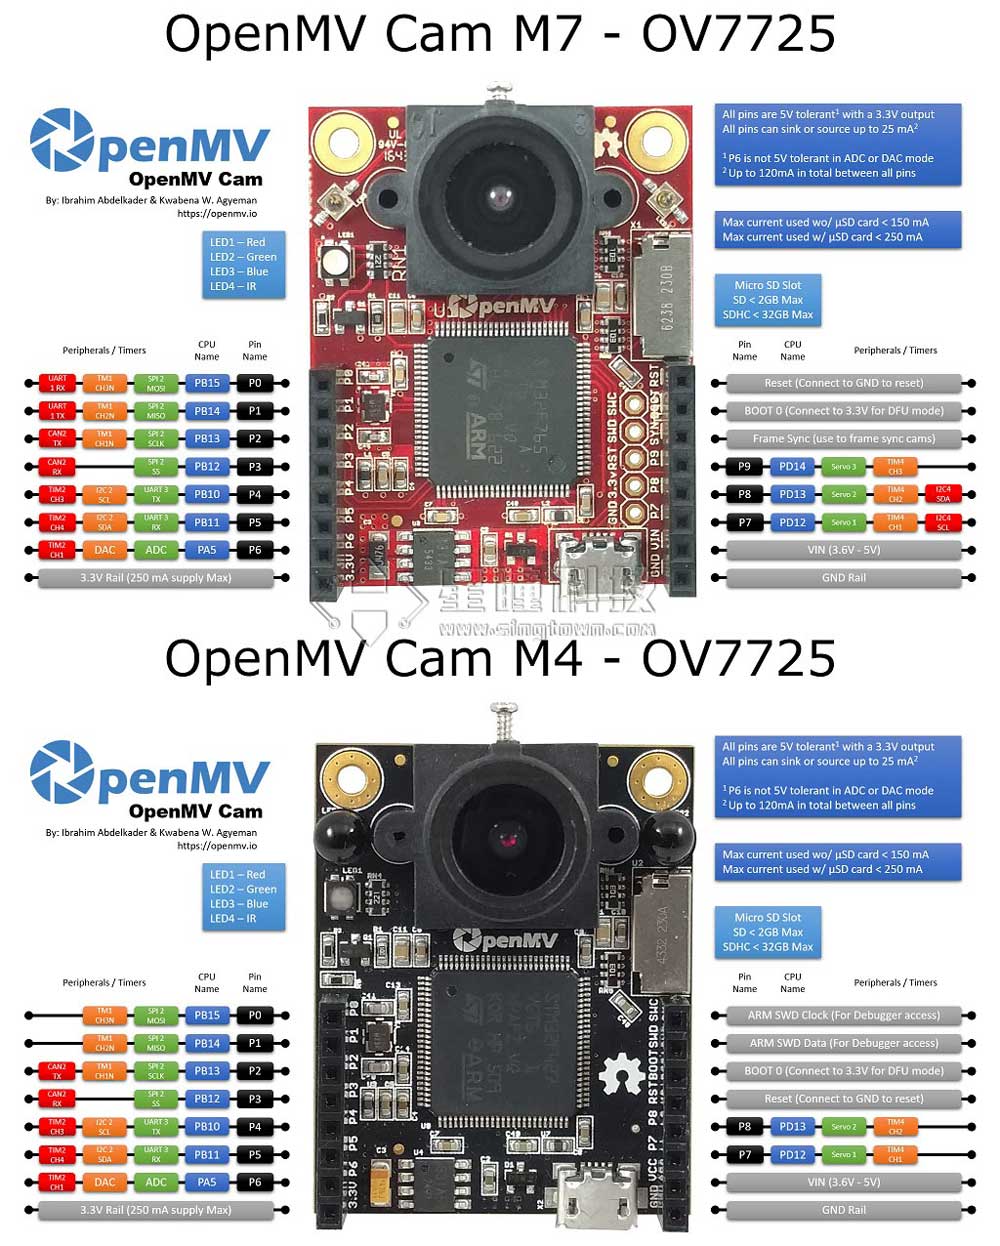
作为一个单片机,控制IO口,IIC,SPI,CAN,PWM。定时器当然都是可以的。
而且,使用python语言,可以非常简单的调用它们,而不用考虑寄存器。
| Tables | OpenMV2 M4 | OpenMV3 M7 | OpenMV4 H7 | OpenMV4 H7 Plus | OpenMV RT1062 | OpenMV N6 |
|---|---|---|---|---|---|---|
| Pin | 9 | 10 | 10 | 10 | 14 | 18 |
| ADC | 1 | 1 | 1 | 1 | 1 | 1 |
| DAC | 1 | 1 | 1 | 1 | 0 | 0 |
| SPI | 1 | 1 | 1 | 1 | 1 | 2 |
| I2C | 1 | 2 | 2 | 2 | 1 | 1 |
| I3C | 0 | 0 | 0 | 0 | 0 | 1 |
| I2S | 0 | 0 | 0 | 0 | 0 | 1 |
| UART | 1 | 2 | 2 | 2 | 1 | 2 |
| Servo | 2 | 3 | 3 | 2 | 4 | 4 |
| CAN bus | 0 | 1 | 1 | 1 | 1 | 2 |
| 电源按键 | 0 | 0 | 0 | 0 | 1 | 1 |
| 自定义按键 | 0 | 0 | 0 | 0 | 1 | 1 |
| WiFi | 需要配合wifi扩展板 | 需要配合wifi扩展板 | 需要配合wifi扩展板 | 需要配合wifi扩展板 | 内置wifi | 内置wifi |
| 蓝牙 | 需外接 | 需外接 | 需外接 | 需外接 | 内置蓝牙5.1 | 内置蓝牙5.1 |
| 以太网 | 不支持 | 不支持 | 不支持 | 不支持 | 支持 | 支持 |
| IMU | 需要配合imu扩展板 | 需要配合imu扩展板 | 需要配合imu扩展板 | 需要配合imu扩展板 | 内置imu | 内置imu |
| 麦克风 | 不支持 | 不支持 | 不支持 | 不支持 | 不支持 | 内置麦克风 |
| 引脚耐受 | 5V | 5V | 5V | 5V | 3.3V | 3.3V |
| 引脚电平 | 3.3V | 3.3V | 3.3V | 3.3V | 3.3V | 3.3V |
| IC | STM32F427 | STM32F765 | STM32H743 | STM32H743 | IMXRT1062 | STM32N6 |
| NPU | 无 | 无 | 无 | 无 | 无 | 600GOPS 1GHZ |
| RAM | 256KB | 512KB | 1MB | 32MB + 1MB | 32MB + 1MB | 64MB + 4.2MB |
| Flash | 1MB | 2MB | 2MB | 32MB + 2MB | 16MB | 32MB |
| 频率 | 180MHz | 216MHZ | 480MHZ | 480MHZ | 600MHZ | 800MHZ |
| 标配感光元件 | OV7725(30W像素) | OV7725(30W像素) | OV7725(30W像素) | OV5640(500W像素) | OV5640(500W像素) | PAG7936(100W像素 彩色全局快门) |
注意:因为MicroPython可以在很多平台上运行。最开始在pyb模块,pyboard,是基于STM32的,但是后来又加入了esp8266和esp32,以及nrf系列,他们的架构和STM32不同。所以官方统一制定了machine模块,所以通用性更高一些,最终pyb会被淘汰。
OpenMV N6 / OpenMV4 H7 Plus / OpenMV4 H7 / OpenMV3,主控为STM32,一般用pyb模块。
OpenMV RT1062,主控为IMXRT1062,只支持machine模块,不支持pyb模块。请使用对应的machine代码哦~
常用的函数
pyb.delay(50) # 延时 50 毫秒
pyb.millis() # 获取从启动开始计时的毫秒数
LED
from pyb import LED

led = LED(1) # 红led
led.toggle()
led.on()#亮
led.off()#灭
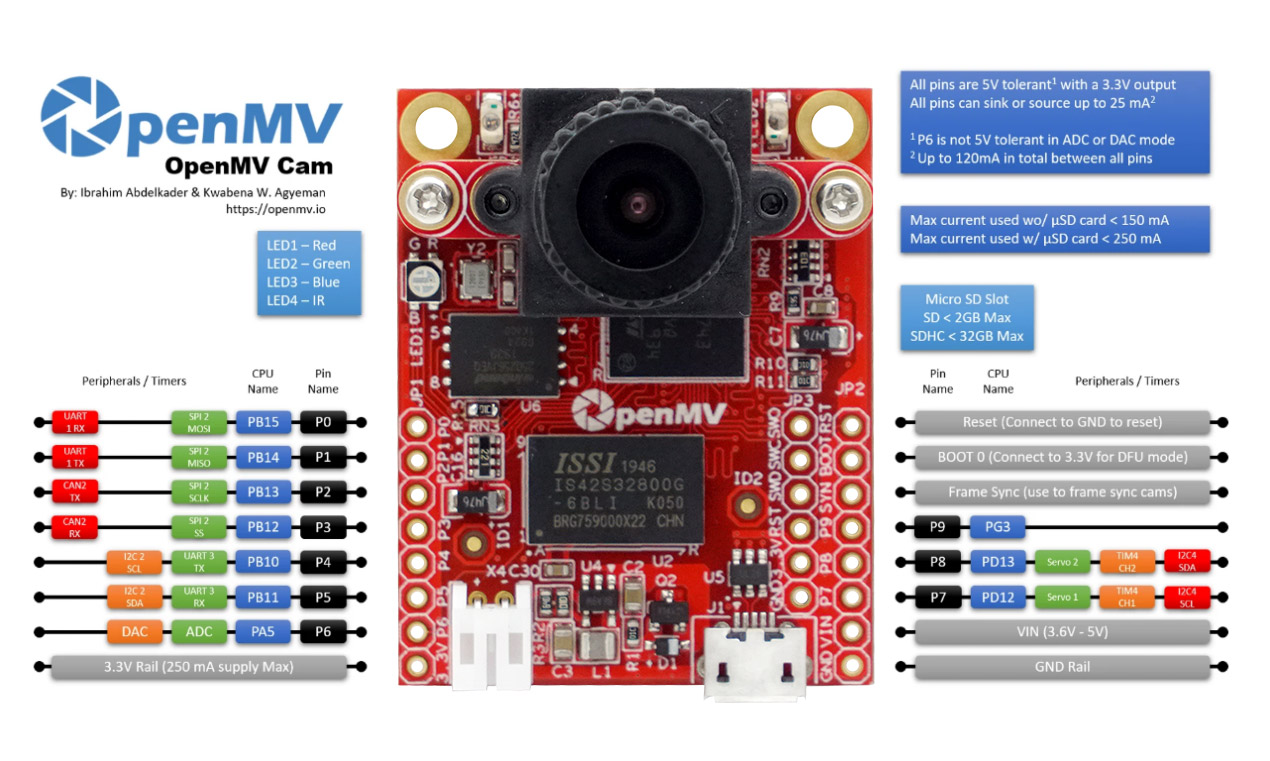
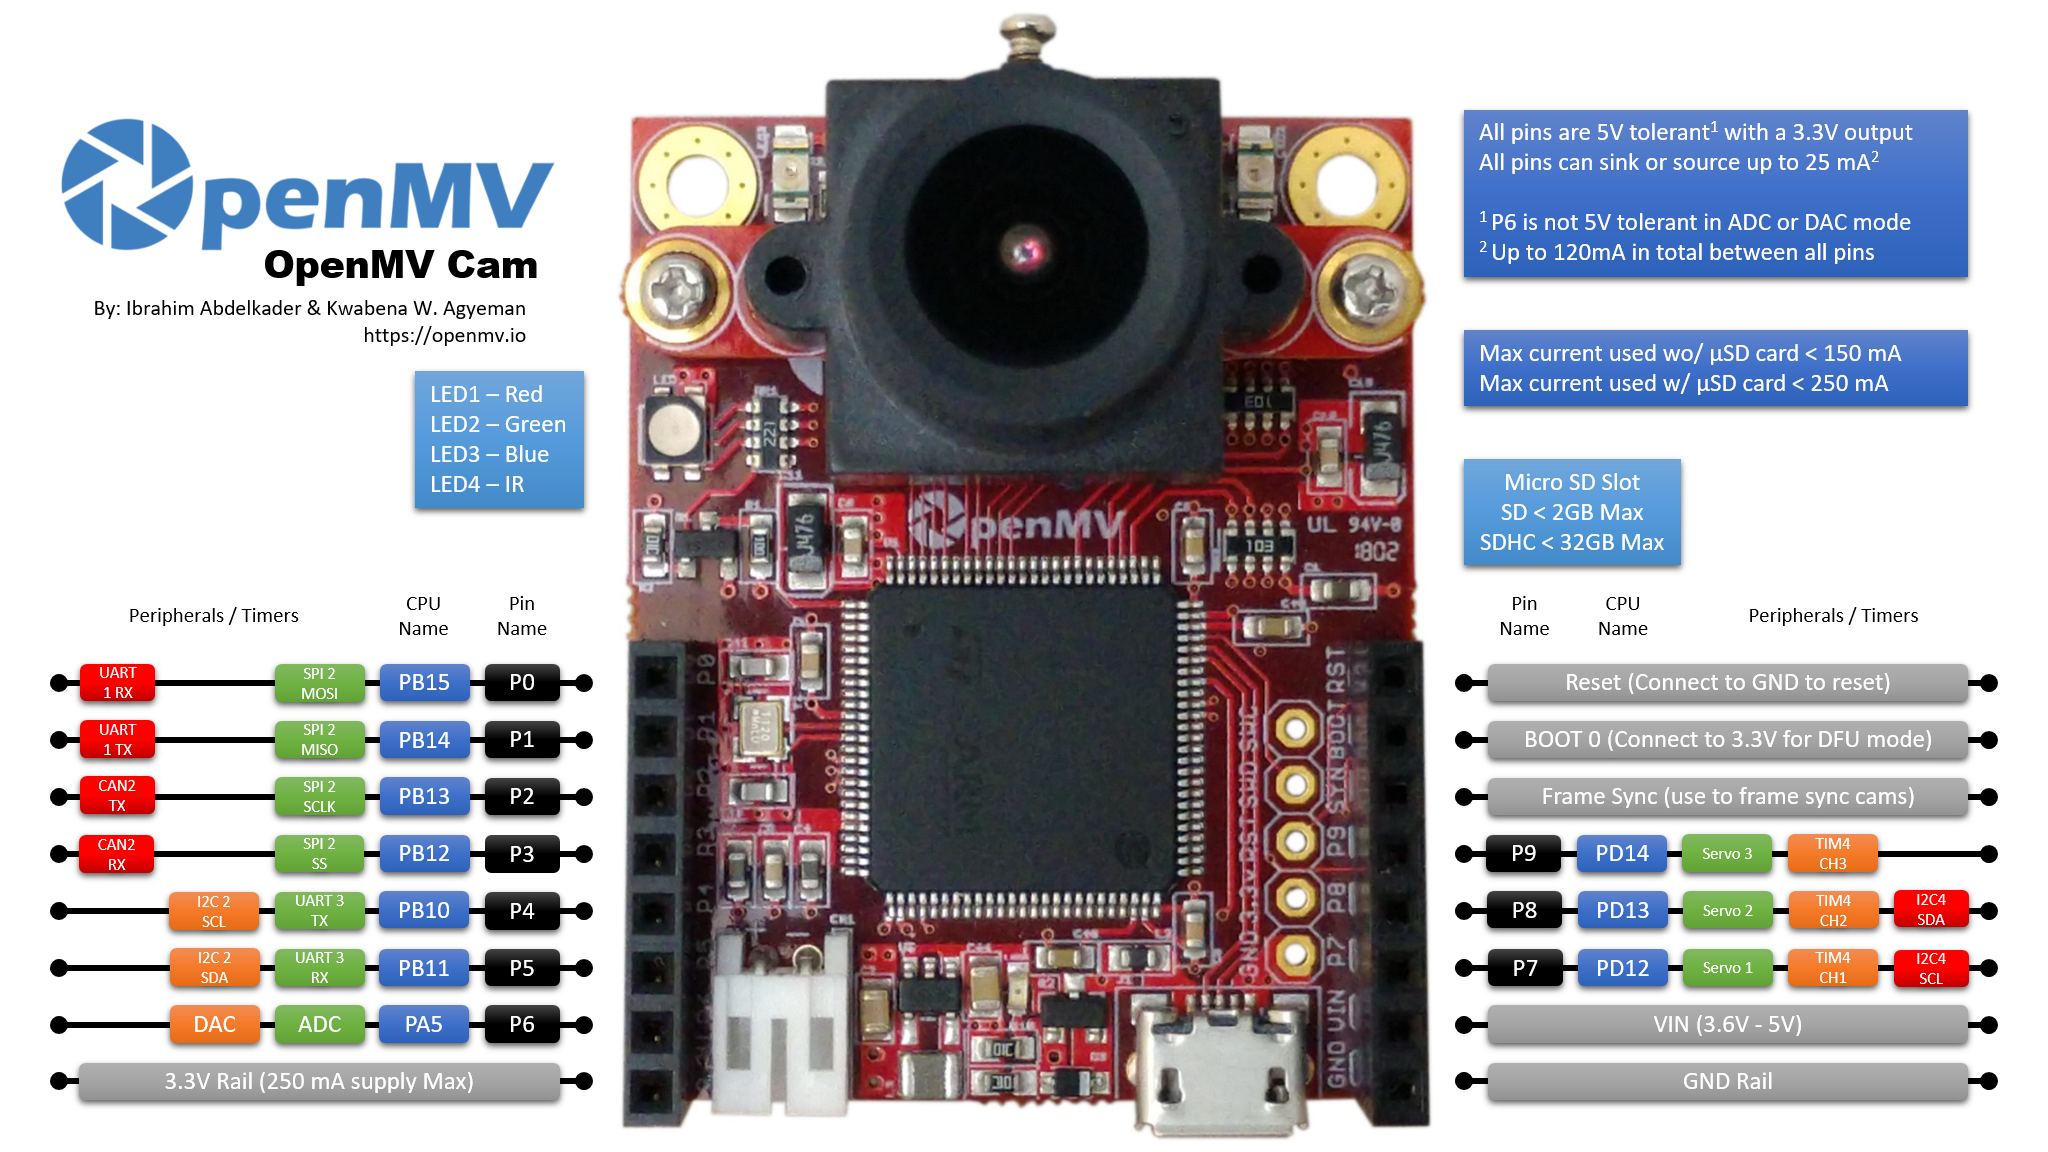
LED(1) -> 红LED
LED(2) -> 绿LED
LED(3) -> 蓝LED
LED(4) -> 红外LED,两个
在 OpenMV RT 上不能用pyb模块,只能使用以下machine模块:
from machine import LED
import time

red_led = LED("LED_RED")
green_led = LED("LED_GREEN")
blue_led = LED("LED_BLUE")
blue_led.off()
green_led.off()
red_led.off()

while(1):
    green_led.toggle()
    red_led.on()
    time.sleep_ms(250)
    red_led.off()
    time.sleep_ms(250)
IO
from pyb import Pin

p_out = Pin('P7', Pin.OUT_PP)#设置p_out为输出引脚
p_out.high()#设置p_out引脚为高
p_out.low()#设置p_out引脚为低

p_in = Pin('P7', Pin.IN, Pin.PULL_UP)#设置p_in为输入引脚,并开启上拉电阻
value = p_in.value() # get value, 0 or 1#读入p_in引脚的值
在 OpenMV RT 上不能用pyb模块,只能使用以下machine模块:
from machine import Pin

p_out = Pin("P7", Pin.OUT)#设置p_out为输出引脚
p_out.high()#设置p_out引脚为高
p_out.low()#设置p_out引脚为低

p_in = Pin("P8", Pin.IN, Pin.PULL_UP)#设置p_in为输入引脚,并开启上拉电阻
value = p_in.value() # get value, 0 or 1#读入p_in引脚的值
Servo
视频教程34 - OpenMV控制三个舵机:https://singtown.com/learn/50541/
from pyb import Servo

s1 = Servo(1) # servo on position 1 (P7)
s1.angle(45) # move to 45 degrees
s1.angle(-60, 1500) # move to -60 degrees in 1500ms
s1.speed(50) # for continuous rotation servos
- Servo(1) -> P7 (PD12)
- Servo(2) -> P8 (PD13)
OpenMV3 M7 / OpenMV4 H7上增加:
- Servo(3) -> P9 (PD14)
注意:OpenMV4 H7 Plus P9不能使用PWM
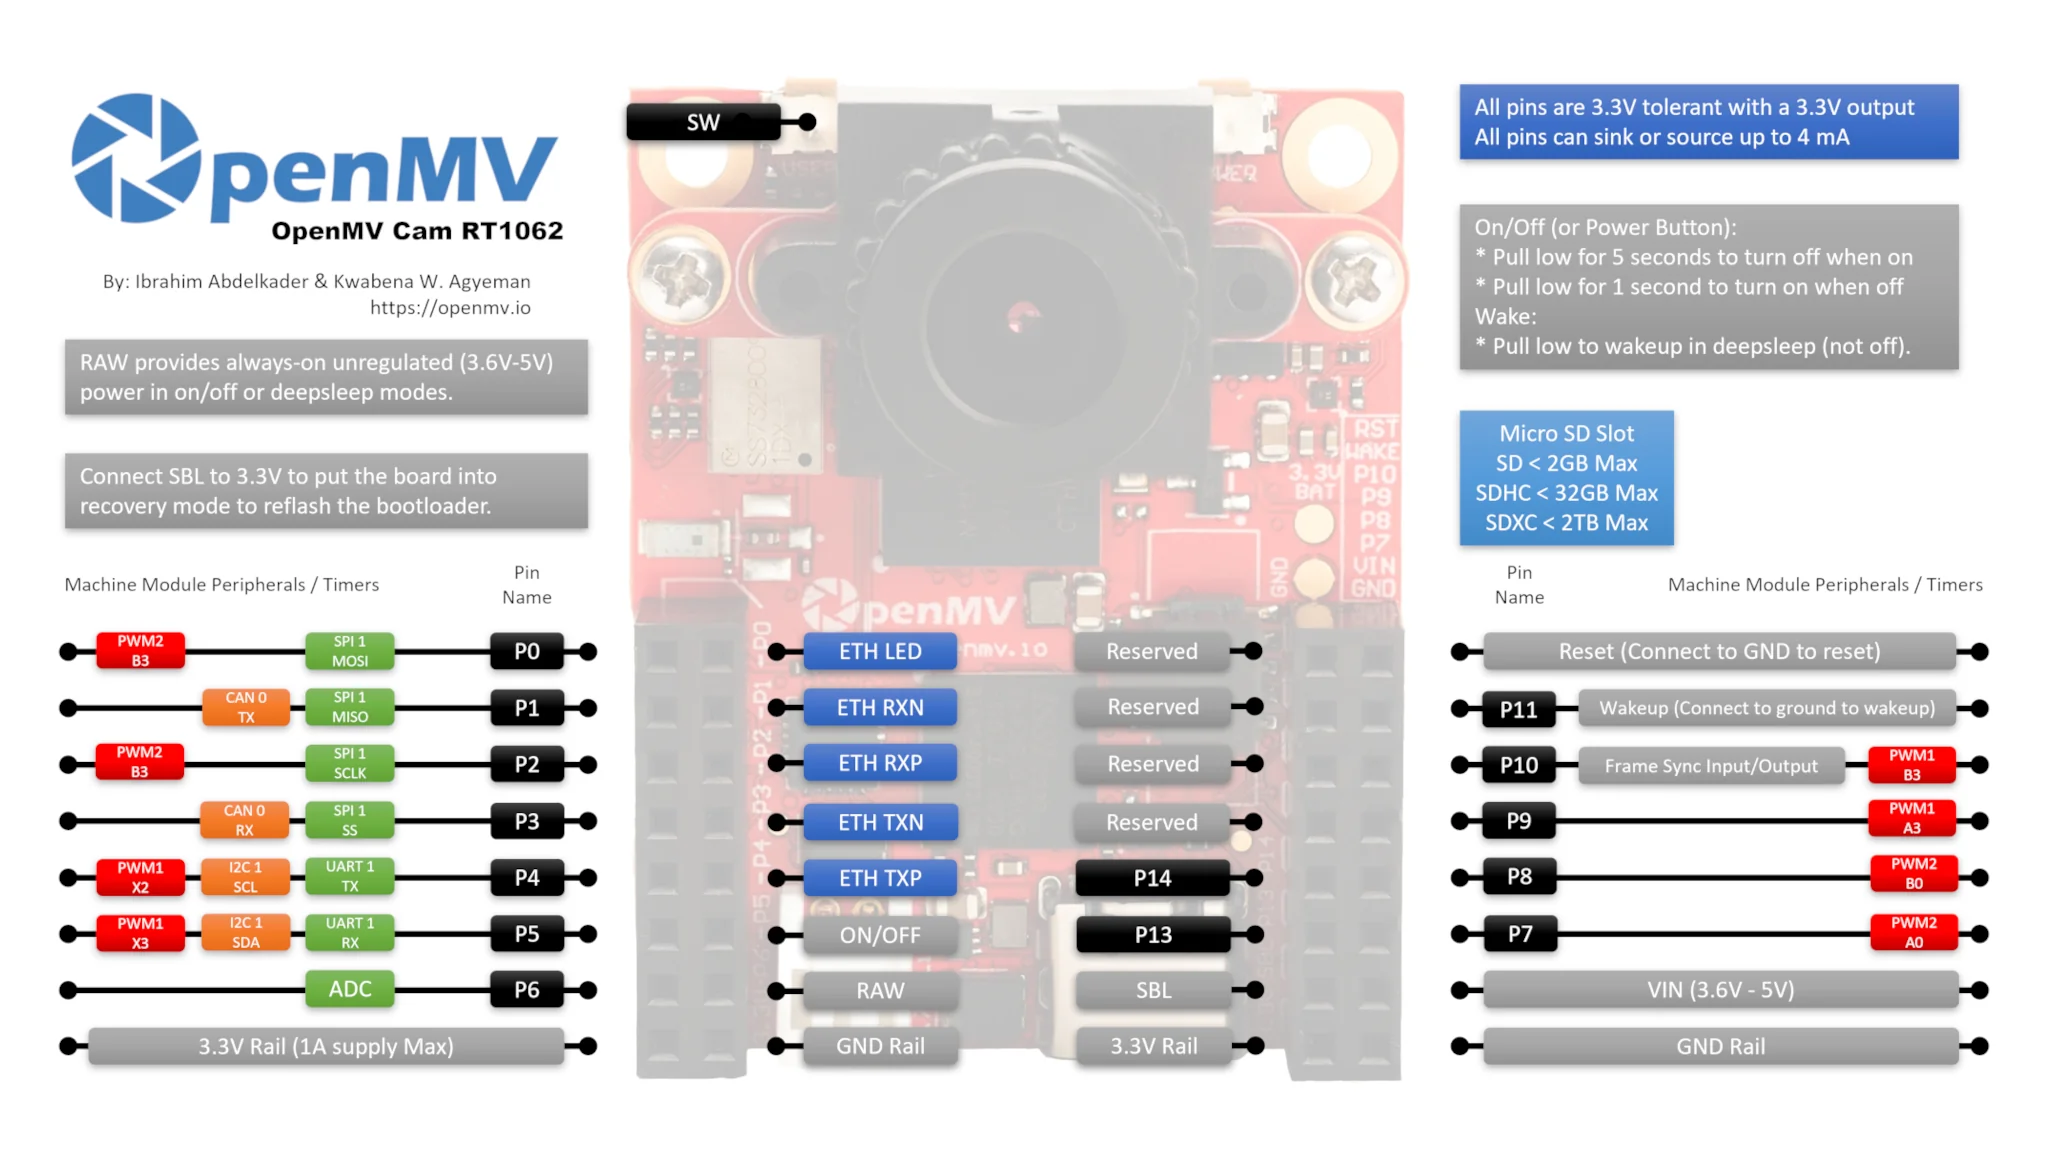
OpenMV RT1062 有P7 P8 P9 P10 四个PWM引脚。 在 OpenMV RT 上不能用pyb模块,只能使用以下machine模块:
# 舵机控制例子
#
# 这个例子展示了如何使用OpenMV来控制舵机
#
# 伺服系统需要 50 Hz PWM,脉冲宽度为 1000us 至 2000us。

import time
from machine import PWM

# P7 和 P8 可以共享相同的 PWM  module,它们需要具有相同的频率。
p7 = PWM("P7", freq=50, duty_ns=(2000 * 1000))
p8 = PWM("P8", freq=50, duty_ns=(2000 * 1000))

# P9 和 P10 可以共享相同的 PWM  module,它们需要具有相同的频率。
p9 = PWM("P9", freq=50, duty_ns=(2000 * 1000))
p10 = PWM("P10", freq=50, duty_ns=(2000 * 1000))


while True:
    for i in range(1000, 2000, 100):
        p7.duty_ns(i * 1000)
        p8.duty_ns(i * 1000)
        p9.duty_ns(i * 1000)
        p10.duty_ns(i * 1000)
        time.sleep_ms(1000)

    for i in range(2000, 1000, -100):
        p7.duty_ns(i * 1000)
        p8.duty_ns(i * 1000)
        p9.duty_ns(i * 1000)
        p10.duty_ns(i * 1000)
        time.sleep_ms(1000)
IO中断
from pyb import Pin, ExtInt

callback = lambda e: print("intr")
ext = ExtInt(Pin('P7'), ExtInt.IRQ_RISING, Pin.PULL_NONE, callback)
在 OpenMV RT 上不能用pyb模块,只能使用以下machine模块:
from machine import Pin
import time
pin0 = Pin("P0", Pin.IN, Pin.PULL_UP)
callback = lambda e: print("intr")
pin0.irq(callback, Pin.IRQ_FALLING)

while True:
    time.sleep(1)
定时器
from pyb import Timer

tim = Timer(4, freq=1000)
tim.counter() # get counter value
tim.freq(0.5) # 0.5 Hz
tim.callback(lambda t: pyb.LED(1).toggle())
Timer 1 Channel 3 Negative -> P0
Timer 1 Channel 2 Negative -> P1
Timer 1 Channel 1 Negative -> P2
Timer 2 Channel 3 Positive -> P4
Timer 2 Channel 4 Positive -> P5
Timer 2 Channel 1 Positive -> P6
Timer 4 Channel 1 Negative -> P7
Timer 4 Channel 2 Negative -> P8
OpenMV M7上增加:
Timer 4 Channel 3 Positive -> P9
在 OpenMV RT 上不能用pyb模块,只能使用以下machine模块:
from machine import LED
from machine import Timer

blue_led = LED("LED_BLUE")

# 当被调用时,我们将返回timer对象
# 注意:在回调中不允许分配内存的函数
def tick(timer):
    blue_led.toggle()

# machine模块目前仅支持-1虚拟定时器。
tim = Timer(-1, freq=1, callback=tick)  # 创建一个定时器对象—以1Hz触发
PWM
from pyb import Pin, Timer

p = Pin('P7') # P7 has TIM4, CH1
tim = Timer(4, freq=1000)
ch = tim.channel(1, Timer.PWM, pin=p)
ch.pulse_width_percent(50)
在 OpenMV RT 上不能用pyb模块,只能使用以下machine模块:
from machine import PWM
import time

p7 = PWM("P7", freq=100, duty_u16=32768)

while True:
    for i in range(0, 65536, 256):
        p7.duty_u16(65535 - i)
        time.sleep_ms(10)
    p7.duty_u16(32768)
ADC
from pyb import Pin, ADC

adc = ADC('P6')
adc.read() # read value, 0-4095
在 OpenMV RT 上不能用pyb模块,只能使用以下machine模块:
from machine import ADC

adc = ADC('P6')
adc.read_u16()
DAC
from pyb import Pin, DAC

dac = DAC('P6')
dac.write(120) # output between 0 and 255
UART
from pyb import UART

uart = UART(3, 9600)
uart.write('hello')
uart.read(5) # read up to 5 bytes
UART 3 RX -> P5 (PB11)
UART 3 TX -> P4 (PB10)
OpenMV3 M7 / OpenMV4 H7/ OpenMV4 H7 Plus上增加:
UART 1 RX -> P0 (PB15)
UART 1 TX -> P1 (PB14)
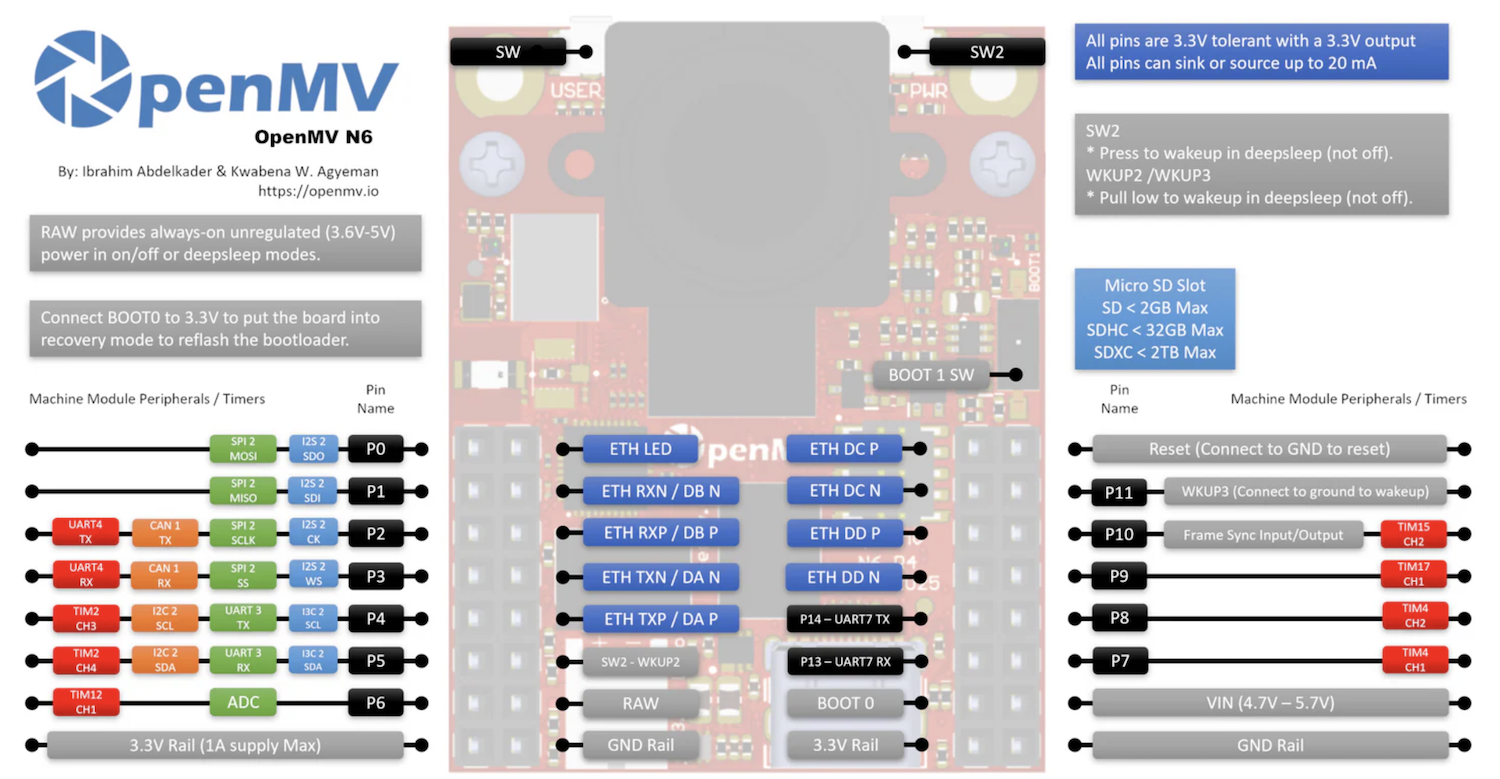
OpenMV N6的串口:
UART 4 RX -> P3
UART 4 TX -> P2
UART 7 RX -> P13
UART 7 TX -> P14
在 OpenMV RT 上不能用pyb模块,只能使用以下machine模块:
from machine import UART

uart = UART(1, 9600)
uart.write('hello')
uart.read(5) # read up to 5 bytes
OpenMV RT1062只有串口1,对应 P4 P5 引脚。
UART 1 RX -> P5 (PB11)
UART 1 TX -> P4 (PB10)
SPI
from pyb import SPI

spi = SPI(2, SPI.MASTER, baudrate=200000, polarity=1, phase=0)
spi.send(b'hello')
spi.recv(5) # receive 5 bytes on the bus
spi.send_recv(b'hello') # send a receive 5 bytes
在 OpenMV RT 上不能用pyb模块,只能使用以下machine模块:
from machine import SPI

spi = SPI(1, baudrate=int(1000000000 / 66), polarity=0, phase=0)
spi.write(b'hello')
spi.read(5) # receive 5 bytes on the bus

txdata = b"12345678"
rxdata = bytearray(len(txdata))
spi.write_readinto(txdata, rxdata)  # Simultaneously write and read bytes.
I2C
from machine import I2C, Pin
i2c = I2C(sda=Pin('P5'),scl=Pin('P4'))

i2c.scan()
i2c.writeto(0x42, b'123')         # write 3 bytes to slave with 7-bit address 42
i2c.readfrom(0x42, 4)             # read 4 bytes from slave with 7-bit address 42

i2c.readfrom_mem(0x42, 8, 3)      # read 3 bytes from memory of slave 42,
                                # starting at memory-address 8 in the slave
i2c.writeto_mem(0x42, 2, b'\x10') # write 1 byte to memory of slave 42
                                # starting at address 2 in the slave
I2C 2 SCL (Serial Clock) -> P4 (PB10)
I2C 2 SDA (Serial Data) -> P5 (PB11)
OpenMV3 M7 / OpenMV4 H7 / OpenMV4 H7 Plus上增加:
I2C 4 SCL (Serial Clock) -> P7 (PD13)
I2C 4 SDA (Serial Data) -> P8 (PD12)
machine库是软件模拟的I2C协议,所以使用任何引脚都可以,但是还是推荐使用上面所说的引脚。
在 OpenMV RT 上可以这样调用:
from machine import I2C, Pin
i2c = I2C(1)

i2c.scan()
i2c.writeto(0x42, b'123')         # write 3 bytes to slave with 7-bit address 42
i2c.readfrom(0x42, 4)             # read 4 bytes from slave with 7-bit address 42

i2c.readfrom_mem(0x42, 8, 3)      # read 3 bytes from memory of slave 42,
                                # starting at memory-address 8 in the slave
i2c.writeto_mem(0x42, 2, b'\x10') # write 1 byte to memory of slave 42
                                # starting at address 2 in the slave
Switch Pin 自定义按键SW
# OpenMV Cam 上的用户开关可通过“SW”引脚读取。
# 该引脚通过 RC 电路在硬件中进行去抖。
# 因此,您只需读取引脚状态即可了解开关是否被按下。

import machine

sw = machine.Pin("SW", machine.Pin.IN)
r = machine.LED("LED_RED")

while True:
    r.value(not sw.value())
    print(sw.value())
仅OpenMV RT、OpenMV N6具有SW自定义按键,OpenMV4 H7 / OpenMV4 H7 Plus / OpenMV3 M7 没有自定义按键。