画图
视觉系统通常需要给使用者提供一些反馈信息。直接在图像中显示出来,很直观。就像10分钟快速上手的程序中一样,当找到色块,把这个区域用矩形框标注出来,这样非常直观。
注意:
颜色可以是灰度值(0-255),或者是彩色值(r, g, b)的tupple。默认是白色。
其中的color关键字必须显示的标明color=。例如:
image.draw_line((10,10,20,30), color=(255,0,0))
image.draw_rectangle(rect_tuple, color=(255,0,0))
画线
- image.draw_line(line_tuple, color=White) 在图像中画一条直线。
- line_tuple的格式是(x0, y0, x1, y1),意思是(x0, y0)到(x1, y1)的直线。
- 颜色可以是灰度值(0-255),或者是彩色值(r, g, b)的tupple。默认是白色
画框
- image.draw_rectangle(rect_tuple, color=White) 在图像中画一个矩形框。
- rect_tuple 的格式是 (x, y, w, h)。
画圆
- image.draw_circle(x, y, radius, color=White) 在图像中画一个圆。
- x,y是圆心坐标
- radius是圆的半径
画十字
- image.draw_cross(x, y, size=5, color=White) 在图像中画一个十字
- x,y是坐标
- size是两侧的尺寸
写字
- image.draw_string(x, y, text, color=White) 在图像中写字 8x10的像素
- x,y是坐标。使用\n, \r, and \r\n会使光标移动到下一行。
- text是要写的字符串。
例子
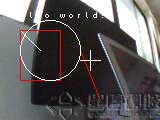
# Hello World Example
#
# Welcome to the OpenMV IDE! Click on the green run arrow button below to run the script!

import sensor, image, time

sensor.reset() # 初始化摄像头
sensor.set_pixformat(sensor.RGB565) # 格式为 RGB565.
sensor.set_framesize(sensor.QQVGA)
sensor.skip_frames(10) # 跳过10帧,使新设置生效
while(True):
    img = sensor.snapshot()         # Take a picture and return the image.
    img.draw_line((20, 30, 40, 50))
    img.draw_line((80, 50, 100, 100), color=(255,0,0))
    img.draw_rectangle((20, 30, 41, 51), color=(255,0,0))
    img.draw_circle(50, 50, 30)
    img.draw_cross(90,60,size=10)
    img.draw_string(10,10, "hello world!")