All kinds of peripherals of pyb
Genaral view
As a single chip,controlling IO port ,IIC, SPI, CAN, PWM and timer is all tolerable.Moreover,using language python is an easy way to transfer them without considering register.

| Tables | OpenMV2 M4 | OpenMV3 M7 | OpenMV4 H7 | OpenMV4 H7 Plus | OpenMV RT1062 |
|---|---|---|---|---|---|
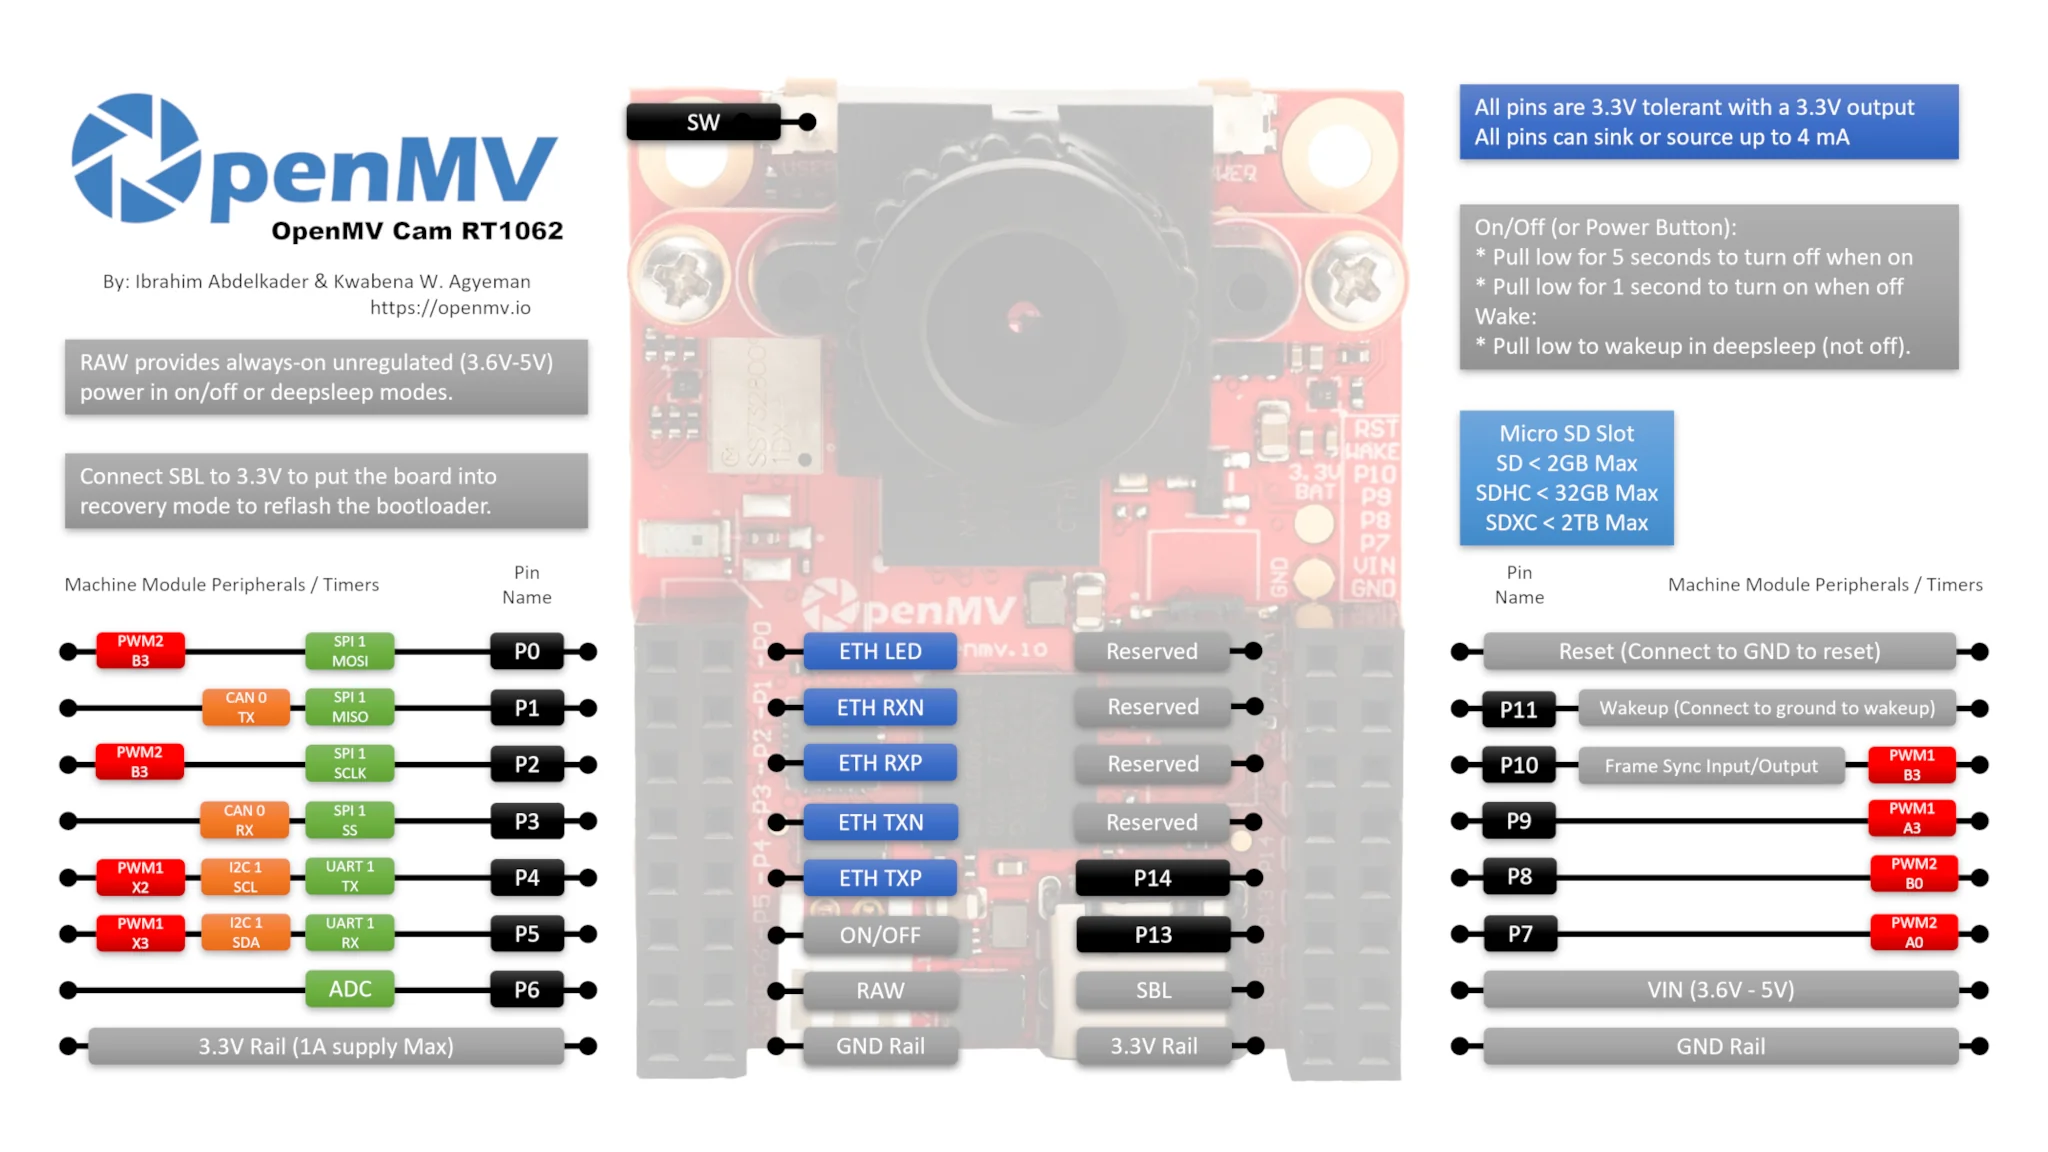
| Pin | 9 | 10 | 10 | 10 | 14 |
| ADC | 1 | 1 | 1 | 1 | 1 |
| DAC | 1 | 1 | 1 | 1 | 0 |
| SPI | 1 | 1 | 1 | 1 | 1 |
| I2C | 1 | 2 | 2 | 2 | 1 |
| UART | 1 | 2 | 2 | 2 | 1 |
| Servo | 2 | 3 | 3 | 2 | 4 |
| CAN bus | 0 | 1 | 1 | 1 | 1 |
| Power button | 0 | 0 | 0 | 0 | 1 |
| Customizable buttons | 0 | 0 | 0 | 0 | 1 |
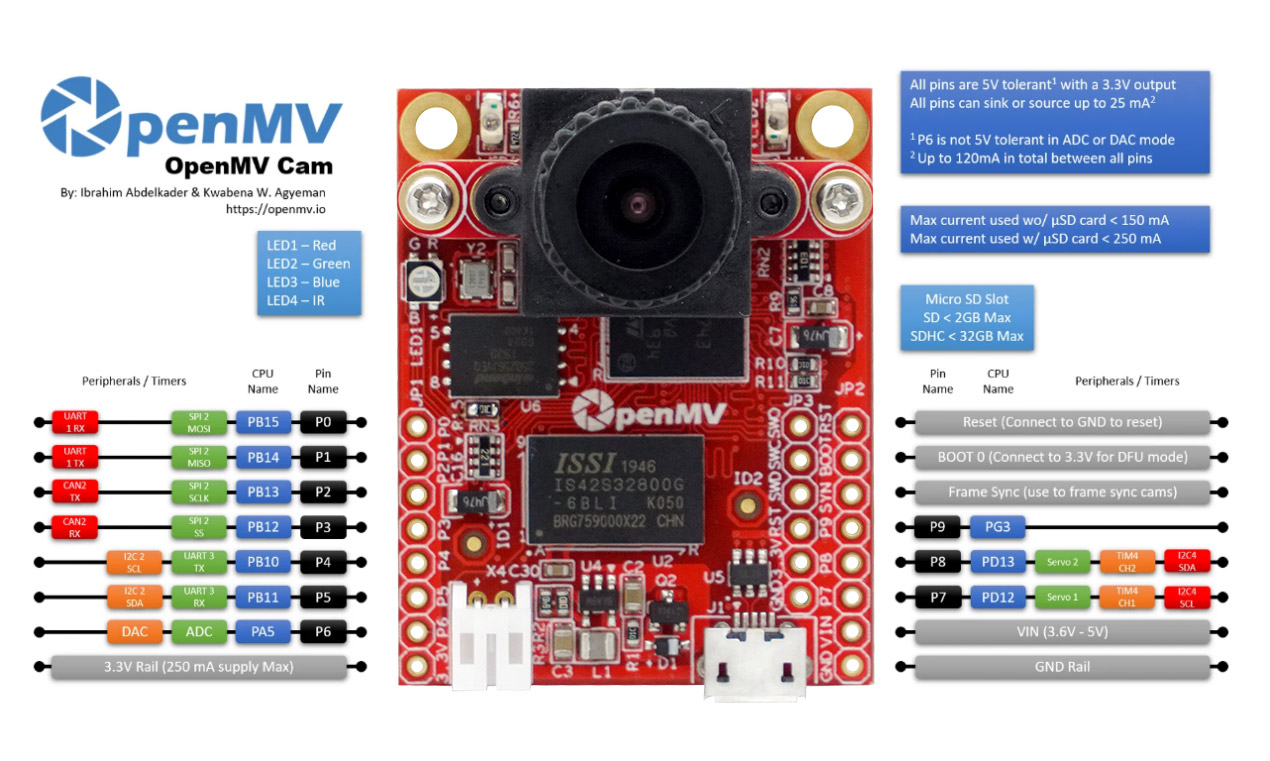
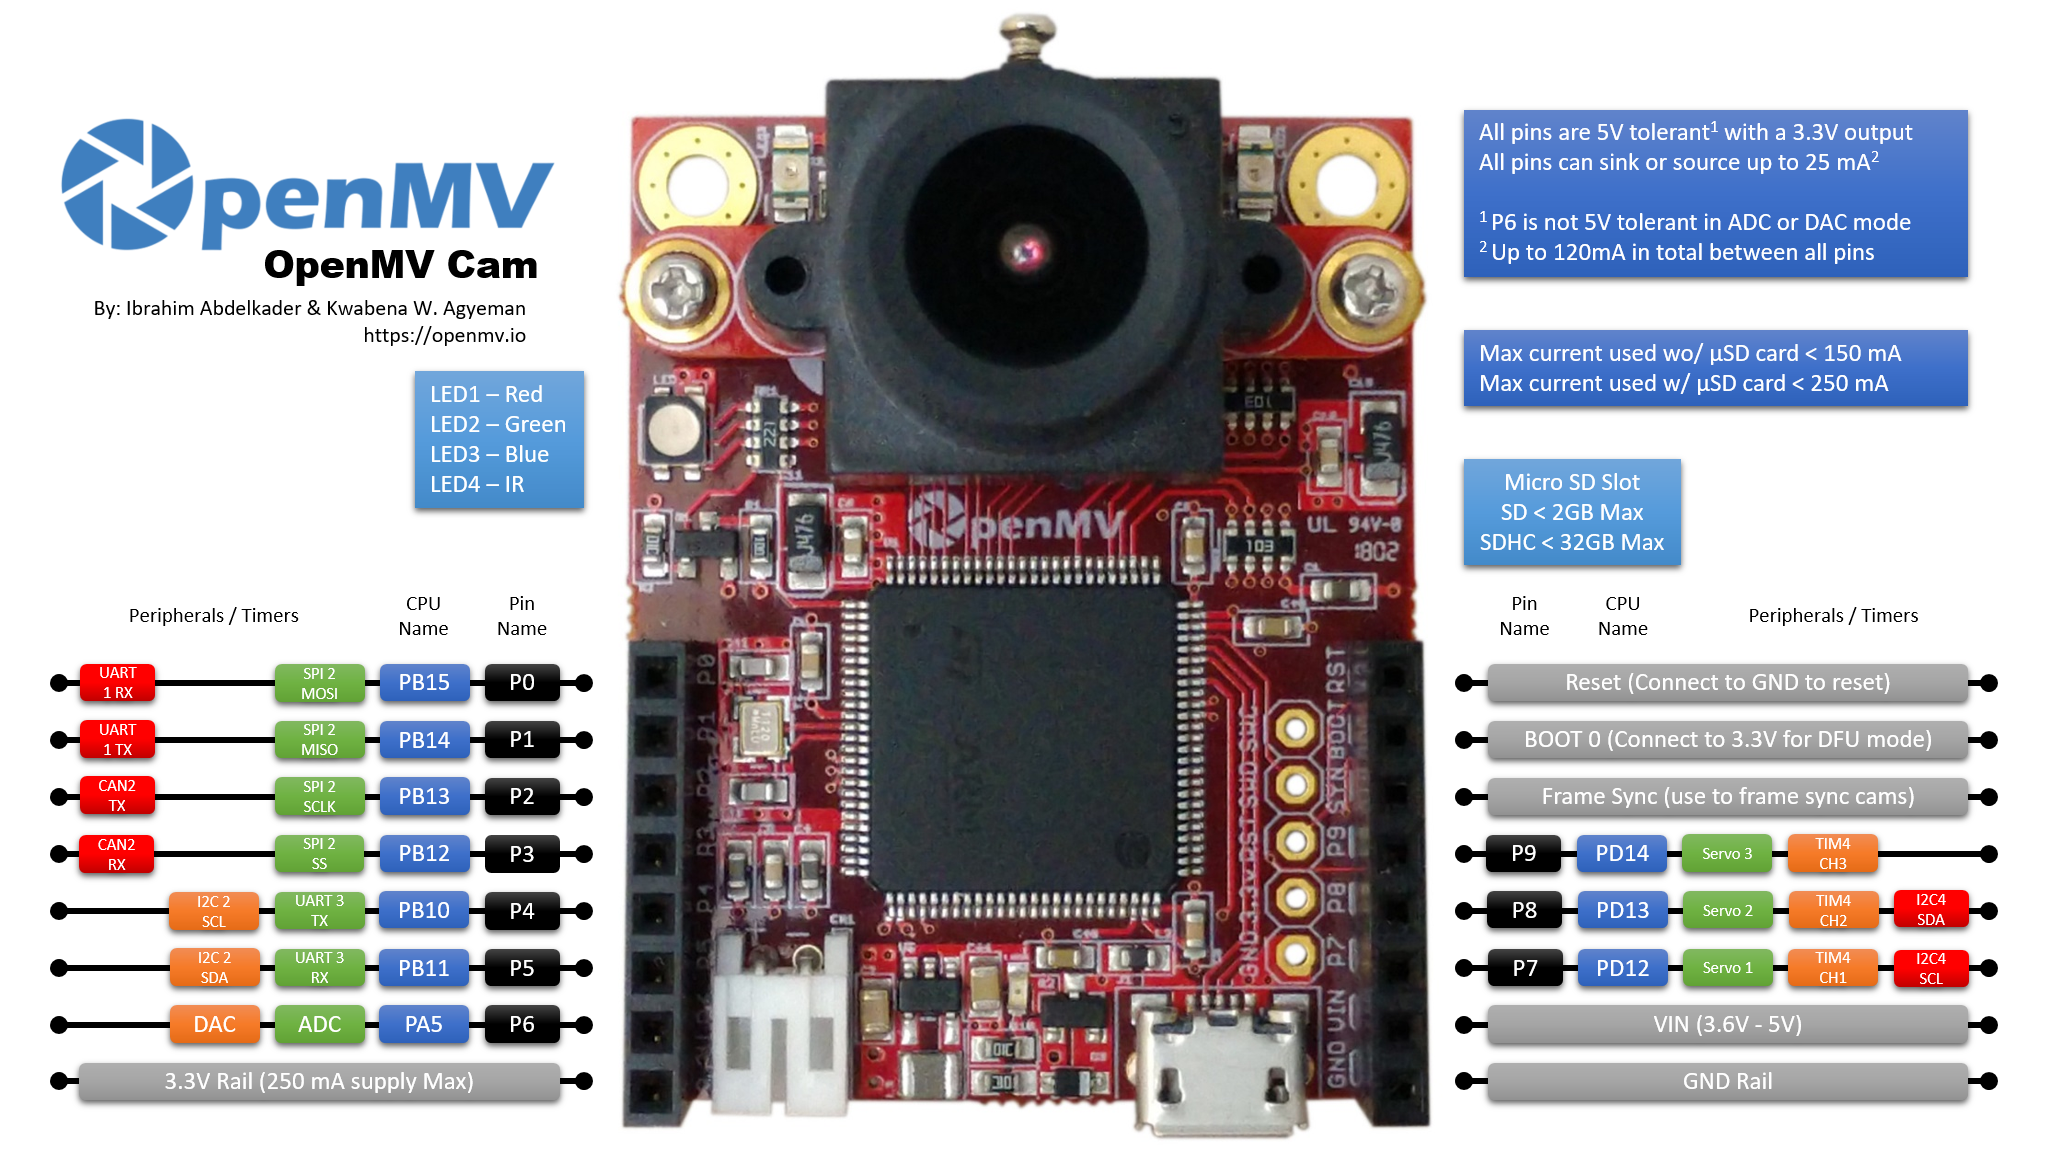
| Pin tolerance | 5V | 5V | 5V | 5V | 3.3V |
| Pin Level | 3.3V | 3.3V | 3.3V | 3.3V | 3.3V |
| IC | STM32F427 | STM32F765 | STM32H743 | STM32H743 | IMXRT1062 |
| RAM | 256KB | 512KB | 1MB | 32MB + 1MB | 32MB + 1MB |
| Flash | 1MB | 2MB | 2MB | 32MB + 2MB | 16MB |
| freq | 180MHz | 216MHZ | 480MHZ | 480MHZ | 600MHZ |
| Standard photosensitive element | OV7725 (30W pixels) | OV7725 (30W pixels) | OV7725 (30W pixels) | OV5640 (5 million pixels) | OV5640 (5 million pixels) |
Note: Because MicroPython can run on many platforms. At first, the pyb module, pyboard, was based on STM32, but later esp8266 and esp32, as well as the nrf series, were added. Their architectures are different from STM32. Therefore, the official unified the machine module, which is more universal, and pyb will eventually be eliminated.
OpenMV4 H7 Plus / OpenMV4 H7 / OpenMV3, the main control is STM32, generally using pyb module.
The latest OpenMV RT1062 in 2024, the main control is IMXRT1062, only supports machine module, not pyb module. Please use the corresponding machine code~
Commonly used functions
pyb.delay(50) # 延时 50 毫秒
pyb.millis() # 获取从启动开始计时的毫秒数
LED
from pyb import LED

led = LED(1) # 红led
led.toggle()
led.on()#亮
led.off()#灭
LED(1) -> Red LED\ LED(2) -> Green LED\ LED(3) -> Blue LED\ LED(4) -> Infrared LED, two
The pyb module cannot be used on OpenMV RT, only the following machine module can be used:
from machine import LED
import time

red_led = LED("LED_RED")
green_led = LED("LED_GREEN")
blue_led = LED("LED_BLUE")
blue_led.off()
green_led.off()
red_led.off()

while(1):
    green_led.toggle()
    red_led.on()
    time.sleep_ms(250)
    red_led.off()
    time.sleep_ms(250)
IO
from pyb import Pin

p_out = Pin('P7', Pin.OUT_PP)#设置p_out为输出引脚
p_out.high()#设置p_out引脚为高
p_out.low()#设置p_out引脚为低

p_in = Pin('P7', Pin.IN, Pin.PULL_UP)#设置p_in为输入引脚,并开启上拉电阻
value = p_in.value() # get value, 0 or 1#读入p_in引脚的值
The pyb module cannot be used on OpenMV RT, only the following machine module can be used:
from machine import Pin

p_out = Pin("P7", Pin.OUT)#设置p_out为输出引脚
p_out.high()#设置p_out引脚为高
p_out.low()#设置p_out引脚为低

p_in = Pin("P8", Pin.IN, Pin.PULL_UP)#设置p_in为输入引脚,并开启上拉电阻
value = p_in.value() # get value, 0 or 1#读入p_in引脚的值
Servo
Video tutorial 34 - OpenMV controls three servos: https://singtown.com/learn/50541/
from pyb import Servo

s1 = Servo(1) # servo on position 1 (P7)
s1.angle(45) # move to 45 degrees
s1.angle(-60, 1500) # move to -60 degrees in 1500ms
s1.speed(50) # for continuous rotation servos
- Servo(1) -> P7 (PD12)
- Servo(2) -> P8 (PD13)
Added on OpenMV3 M7 / OpenMV4 H7:
- Servo(3) -> P9 (PD14)
Note: OpenMV4 H7 Plus P9 cannot use PWM
OpenMV RT1062 has four PWM pins: P7 P8 P9 P10. You cannot use the pyb module on OpenMV RT, you can only use the following machine module:
# 舵机控制例子
#
# 这个例子展示了如何使用OpenMV来控制舵机
#
# 伺服系统需要 50 Hz PWM,脉冲宽度为 1000us 至 2000us。

import time
from machine import PWM

# P7 和 P8 可以共享相同的 PWM  module,它们需要具有相同的频率。
p7 = PWM("P7", freq=50, duty_ns=(2000 * 1000))
p8 = PWM("P8", freq=50, duty_ns=(2000 * 1000))

# P9 和 P10 可以共享相同的 PWM  module,它们需要具有相同的频率。
p9 = PWM("P9", freq=50, duty_ns=(2000 * 1000))
p10 = PWM("P10", freq=50, duty_ns=(2000 * 1000))


while True:
    for i in range(1000, 2000, 100):
        p7.duty_ns(i * 1000)
        p8.duty_ns(i * 1000)
        p9.duty_ns(i * 1000)
        p10.duty_ns(i * 1000)
        time.sleep_ms(1000)

    for i in range(2000, 1000, -100):
        p7.duty_ns(i * 1000)
        p8.duty_ns(i * 1000)
        p9.duty_ns(i * 1000)
        p10.duty_ns(i * 1000)
        time.sleep_ms(1000)
IO interrupt
from pyb import Pin, ExtInt

callback = lambda e: print("intr")
ext = ExtInt(Pin('P7'), ExtInt.IRQ_RISING, Pin.PULL_NONE, callback)
The pyb module cannot be used on OpenMV RT, only the following machine module can be used:
from machine import Pin
import time
pin0 = Pin("P0", Pin.IN, Pin.PULL_UP)
callback = lambda e: print("intr")
pin0.irq(callback, Pin.IRQ_FALLING)

while True:
    time.sleep(1)
Timer
from pyb import Timer

tim = Timer(4, freq=1000)
tim.counter() # get counter value
tim.freq(0.5) # 0.5 Hz
tim.callback(lambda t: pyb.LED(1).toggle())
Timer 1 Channel 3 Negative -> P0\ Timer 1 Channel 2 Negative -> P1\ Timer 1 Channel 1 Negative -> P2\ Timer 2 Channel 3 Positive -> P4\ Timer 2 Channel 4 Positive -> P5\ Timer 2 Channel 1 Positive -> P6\ Timer 4 Channel 1 Negative -> P7\ Timer 4 Channel 2 Negative -> P8
Added on OpenMV M7:\ Timer 4 Channel 3 Positive -> P9
The pyb module cannot be used on OpenMV RT, only the following machine module can be used:
from machine import LED
from machine import Timer

blue_led = LED("LED_BLUE")

# 当被调用时,我们将返回timer对象
# 注意:在回调中不允许分配内存的函数
def tick(timer):
    blue_led.toggle()

# machine模块目前仅支持-1虚拟定时器。
tim = Timer(-1, freq=1, callback=tick)  # 创建一个定时器对象—以1Hz触发
PWM
from pyb import Pin, Timer

p = Pin('P7') # P7 has TIM4, CH1
tim = Timer(4, freq=1000)
ch = tim.channel(1, Timer.PWM, pin=p)
ch.pulse_width_percent(50)
The pyb module cannot be used on OpenMV RT, only the following machine module can be used:
from machine import PWM
import time

p7 = PWM("P7", freq=100, duty_u16=32768)

while True:
    for i in range(0, 65536, 256):
        p7.duty_u16(65535 - i)
        time.sleep_ms(10)
    p7.duty_u16(32768)
ADC
from pyb import Pin, ADC

adc = ADC('P6')
adc.read() # read value, 0-4095
The pyb module cannot be used on OpenMV RT, only the following machine module can be used:
from machine import ADC

adc = ADC('P6')
adc.read_u16()
DAC
from pyb import Pin, DAC

dac = DAC('P6')
dac.write(120) # output between 0 and 255
UART
from pyb import UART

uart = UART(3, 9600)
uart.write('hello')
uart.read(5) # read up to 5 bytes
UART 3 RX ->; P5 (PB11)\ UART 3 TX -> P4 (PB10)
Added on OpenMV3 M7 / OpenMV4 H7 / OpenMV4 H7 Plus:\ UART 1 RX -> P0 (PB15)\ UART 1 TX -> P1 (PB14)
The pyb module cannot be used on OpenMV RT, only the following machine module can be used:
from machine import UART

uart = UART(1, 9600)
uart.write('hello')
uart.read(5) # read up to 5 bytes
OpenMV RT1062 only has serial port 1, corresponding to P4 P5 pins. UART 1 RX -> P5 (PB11)\ UART 1 TX -> P4 (PB10)
SPI
from pyb import SPI

spi = SPI(2, SPI.MASTER, baudrate=200000, polarity=1, phase=0)
spi.send(b'hello')
spi.recv(5) # receive 5 bytes on the bus
spi.send_recv(b'hello') # send a receive 5 bytes
The pyb module cannot be used on OpenMV RT, only the following machine module can be used:
from machine import SPI

spi = SPI(1, baudrate=int(1000000000 / 66), polarity=0, phase=0)
spi.write(b'hello')
spi.read(5) # receive 5 bytes on the bus

txdata = b"12345678"
rxdata = bytearray(len(txdata))
spi.write_readinto(txdata, rxdata)  # Simultaneously write and read bytes.
I2C
from machine import I2C, Pin
i2c = I2C(sda=Pin('P5'),scl=Pin('P4'))

i2c.scan()
i2c.writeto(0x42, b'123')         # write 3 bytes to slave with 7-bit address 42
i2c.readfrom(0x42, 4)             # read 4 bytes from slave with 7-bit address 42

i2c.readfrom_mem(0x42, 8, 3)      # read 3 bytes from memory of slave 42,
                                # starting at memory-address 8 in the slave
i2c.writeto_mem(0x42, 2, b'\x10') # write 1 byte to memory of slave 42
                                # starting at address 2 in the slave
I2C 2 SCL (Serial Clock) -> P4 (PB10)\ I2C 2 SDA (Serial Data) -> P5 (PB11)
Added on OpenMV3 M7 / OpenMV4 H7 / OpenMV4 H7 Plus:\ I2C 4 SCL (Serial Clock) -> P7 (PD13)\ I2C 4 SDA (Serial Data) -> P8 (PD12)
The machine library is a software-emulated I2C protocol, so any pins can be used, but it is recommended to use the pins mentioned above.
On OpenMV RT, you can call it like this:
from machine import I2C, Pin
i2c = I2C(1)

i2c.scan()
i2c.writeto(0x42, b'123')         # write 3 bytes to slave with 7-bit address 42
i2c.readfrom(0x42, 4)             # read 4 bytes from slave with 7-bit address 42

i2c.readfrom_mem(0x42, 8, 3)      # read 3 bytes from memory of slave 42,
                                # starting at memory-address 8 in the slave
i2c.writeto_mem(0x42, 2, b'\x10') # write 1 byte to memory of slave 42
                                # starting at address 2 in the slave
Switch Pin Custom Button SW
# OpenMV Cam 上的用户开关可通过“SW”引脚读取。
# 该引脚通过 RC 电路在硬件中进行去抖。
# 因此,您只需读取引脚状态即可了解开关是否被按下。

import machine

sw = machine.Pin("SW", machine.Pin.IN)
r = machine.LED("LED_RED")

while True:
    r.value(not sw.value())
    print(sw.value())
Only OpenMV RT has SW custom buttons, OpenMV4 H7 / OpenMV4 H7 Plus / OpenMV3 M7 do not have custom buttons.