Routine explanation -09-keypoints Feature point detection
Video tutorial 16 - Feature point detection and storage: https://singtown.com/learn/50021/
This routine is 09-feature-Detection-keypoints.py\ This routine uses the FAST/AGAST algorithm for feature extraction and target tracking, and only supports grayscale images.
Note: This routine will take the object that appears in the first ten seconds of the program as the target feature. Please place the target object in the center of the camera at the beginning of the program until the feature corner point appears, proving that the target feature has been identified and recorded.
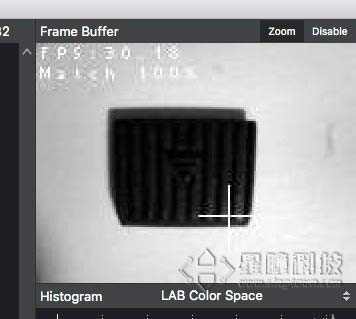
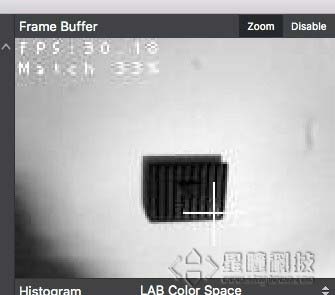
During the matching process, if a cross and a rectangular frame appear on the screen, it proves that the matching is successful
# 利用特征点检测特定物体例程。
# 向相机显示一个对象,然后运行该脚本。 一组关键点将被提取一次,然后
# 在以下帧中进行跟踪。 如果您想要一组新的关键点,请重新运行该脚本。
# 注意:请参阅文档以调整find_keypoints和match_keypoints。
import sensor, time, image
# 重置传感器
sensor.reset()
# 传感器设置
sensor.set_contrast(3)
sensor.set_gainceiling(16)
sensor.set_framesize(sensor.VGA)
sensor.set_windowing((320, 240))
sensor.set_pixformat(sensor.GRAYSCALE)
sensor.skip_frames(time = 2000)
sensor.set_auto_gain(False, value=100)
#画出特征点
def draw_keypoints(img, kpts):
if kpts:
print(kpts)
img.draw_keypoints(kpts)
img = sensor.snapshot()
time.sleep_ms(1000)
kpts1 = None
#kpts1保存目标物体的特征,可以从文件导入特征,但是不建议这么做。
#kpts1 = image.load_descriptor("/desc.orb")
#img = sensor.snapshot()
#draw_keypoints(img, kpts1)
clock = time.clock()
while (True):
clock.tick()
img = sensor.snapshot()
if (kpts1 == None):
#如果是刚开始运行程序,提取最开始的图像作为目标物体特征,kpts1保存目标物体的特征
#默认会匹配目标特征的多种比例大小,而不仅仅是保存目标特征时的大小,比模版匹配灵活。
# NOTE: By default find_keypoints returns multi-scale keypoints extracted from an image pyramid.
kpts1 = img.find_keypoints(max_keypoints=150, threshold=10, scale_factor=1.2)
#image.find_keypoints(roi=Auto, threshold=20, normalized=False, scale_factor=1.5, max_keypoints=100, corner_detector=CORNER_AGAST)
#roi表示识别的区域,是一个元组(x,y,w,h),默认与framsesize大小一致。
#threshold是0~255的一个阈值,用来控制特征点检测的角点数量。用默认的AGAST特征点检测,这个阈值大概是20。用FAST特征点检测,这个阈值大概是60~80。阈值越低,获得的角点越多。
#normalized是一个布尔数值,默认是False,可以匹配目标特征的多种大小(比ncc模版匹配效果灵活)。如果设置为True,关闭特征点检测的多比例结果,仅匹配目标特征的一种大小(类似于模版匹配),但是运算速度会更快一些。
#scale_factor是一个大于1.0的浮点数。这个数值越高,检测速度越快,但是匹配准确率会下降。一般在1.35~1.5左右最佳。
#max_keypoints是一个物体可提取的特征点的最大数量。如果一个物体的特征点太多导致RAM内存爆掉,减小这个数值。
#corner_detector是特征点检测采取的算法,默认是AGAST算法。FAST算法会更快但是准确率会下降。
draw_keypoints(img, kpts1)
#画出此时的目标特征
else:
# 当与最开始的目标特征进行匹配时,默认设置normalized=True,只匹配目标特征的一种大小。
# NOTE: When extracting keypoints to match the first descriptor, we use normalized=True to extract
# keypoints from the first scale only, which will match one of the scales in the first descriptor.
kpts2 = img.find_keypoints(max_keypoints=150, threshold=10, normalized=True)
#如果检测到特征物体
if (kpts2):
#匹配当前找到的特征和最初的目标特征的相似度
match = image.match_descriptor(kpts1, kpts2, threshold=85)
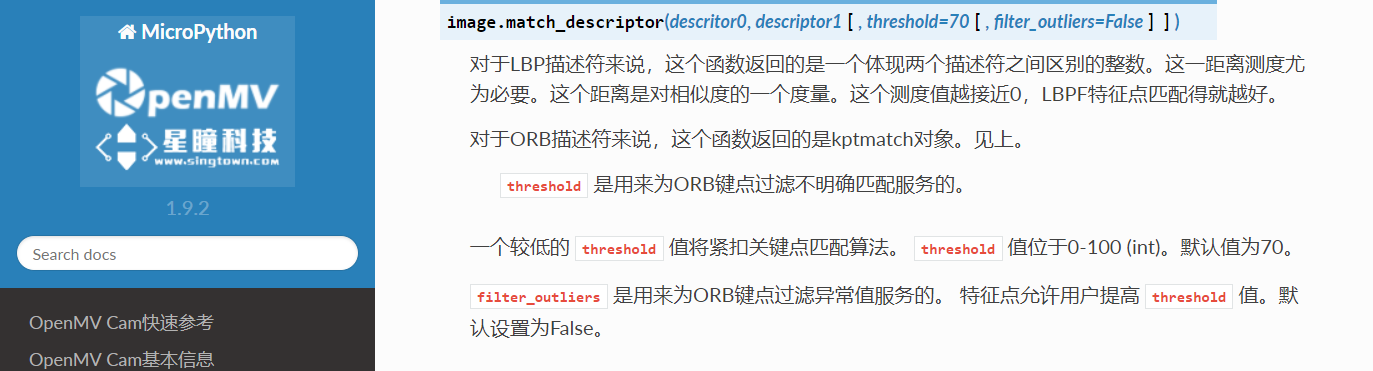
#image.match_descriptor(descritor0, descriptor1, threshold=70, filter_outliers=False)。本函数返回kptmatch对象。
#threshold阈值设置匹配的准确度,用来过滤掉有歧义的匹配。这个值越小,准确度越高。阈值范围0~100,默认70
#filter_outliers默认关闭。
#match.count()是kpt1和kpt2的匹配的近似特征点数目。
#如果大于10,证明两个特征相似,匹配成功。
if (match.count()>10):
# If we have at least n "good matches"
# Draw bounding rectangle and cross.
#在匹配到的目标特征中心画十字和矩形框。
img.draw_rectangle(match.rect())
img.draw_cross(match.cx(), match.cy(), size=10)
#match.theta()是匹配到的特征物体相对目标物体的旋转角度。
print(kpts2, "matched:%d dt:%d"%(match.count(), match.theta()))
# 不建议draw_keypoints画出特征关键点。
# 注意:如果你想绘制关键点,取消注释
#img.draw_keypoints(kpts2, size=KEYPOINTS_SIZE, matched=True)
#打印帧率。
img.draw_string(0, 0, "FPS:%.2f"%(clock.fps()))
The effect of running the program:
Singtown Technology OpenMV official Chinese document function explanation:

Singtown Technology OpenMV official Chinese document function explanation:
Comparison of template matching and feature point detection:
Template matching (find_temolate) uses the ncc algorithm, which can only match patterns that are basically the same size and angle as the template image. The limitations are relatively large. If the target pattern in the field of view is slightly larger or smaller than the template image, the match may not be successful.
Template matching is suitable for situations where the distance between the camera and the target object is determined and dynamic movement is not required. For example, it is suitable for the detection of specific objects on the assembly line, but not for the car to track a moving volleyball (because the distance between the moving volleyball and the camera is dynamic, and the size of the volleyball seen by the camera will change, and it will not be exactly the same as the template image).
For multi-angle and multi-size matching, you can try to save multiple templates and use Multiple template matching.
Feature point detection (find_keypoint): If you just started running the program, the routine extracts the first image as the target object feature, and kpts1 saves the target object feature. By default, it will match multiple scales and angles of the target feature, rather than just saving the size and angle of the target feature. It is more flexible than template matching and does not need to save multiple template images like multi-template matching.
Feature point detection can also save the target features in advance. This was not recommended before because interference from ambient light and other reasons may cause different features in different light each time the program is run, and the matching degree will be reduced. However, in the latest version of the firmware, the adjustment of exposure, white balance, and automatic gain value has been added. The exposure value and white balance value can be manually defined, which will relatively reduce the interference of light. You can also try to save the target features in advance.