Photosensitive element
Sensor module, used to set the parameters of the photosensitive element.
For example:
import csi#引入感光元件的模块
csi0 = csi.CSI()


# 设置摄像头
csi0.reset()#初始化感光元件
csi0.pixformat(csi.RGB565)#设置为彩色
csi0.framesize(csi.QVGA)#设置图像的大小
csi0.snapshot(time=2000)#跳过一些帧,在更改设置后等待感光元件变稳定。

# 一直拍照
while(True):
    img = csi0.snapshot()#拍摄一张照片,img为一个image对象
Initialization
- csi0.reset() initializes the photosensitive element
Set color/black and white
- csi0.pixformat() sets the pixel mode.
- csi.GRAYSCALE: grayscale, 8 bits per pixel.
- csi.RGB565: color, 16 bits per pixel.
Set the image size
- csi0.framesize() Set the image size
- csi.QQCIF: 88x72
- csi.QCIF: 176x144
- csi.CIF: 352x288
- csi.QQSIF: 88x60
- csi.QSIF: 176x120
- csi.SIF: 352x240
- csi.QQQQVGA: 40x30
- csi.QQQVGA: 80x60
- csi.QQVGA: 160x120
- csi.QVGA: 320x240
- csi.VGA: 640x480
- csi.HQQQVGA: 80x40
- csi.HQQVGA: 160x80
- csi.HQVGA: 240x160
- csi.B64X32: 64x32 (for frame difference image.find_displacement())
- csi.B64X64: 64x64 for frame difference image.find_displacement())
- csi.B128X64: 128x64 (for frame difference image.find_displacement())
- csi.B128X128: 128x128 (for frame difference image.find_displacement())
- csi.LCD: 128x160 (for LCD expansion board)
- csi.QQVGA2: 128x160 (for LCD expansion board)
- csi.WVGA: 720x480 (for MT9V034)
- csi.WVGA2:752x480 (for MT9V034)
- csi.SVGA: 800x600 (for OV5640 sensor only)
- csi.XGA: 1024x768 (for OV5640 sensor only)
- csi.SXGA: 1280x1024 (for OV5640 sensor only)
- csi.UXGA: 1600x1200 (for OV5640 sensor only)
- csi.HD: 1280x720 (for OV5640 sensor only)
- csi.FHD: 1920x1080 (for OV5640 sensor only)
- csi.QHD: 2560x1440 (for OV5640 sensor only)
- csi.QXGA: 2048x1536 (OV5640 sensor only)
- csi.WQXGA: 2560x1600 (OV5640 sensor only)
- csi.WQXGA2: 2592x1944 (OV5640 sensor only)
Skip some frames
- csi0.snapshot(frames=10) Skip n photos. After changing the settings, skip some frames and wait for the sensor to stabilize.
Get an image
- csi0.snapshot() Take a photo and return an image object.
Automatic gain/white balance/exposure
csi0.auto_gain() Automatic gain on (True) or off (False). When using color tracking, you need to turn off automatic gain.
csi0.auto_whitebal() Automatic white balance on (True) or off (False). When using color tracking, you need to turn off automatic white balance.
csi0.auto_exposure(enable[\, exposure_us])
- enable turns auto exposure on (True) or off (False). On by default.
- If enable is False, exposure_us can be used to set a fixed exposure time (in microseconds).
Set window ROI
csi0.window(roi)
ROI: Region Of Interest, the term "region of interest" in image processing. It
is the region to be processed extracted from the image to be processed.\
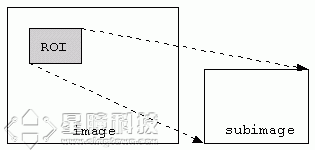
csi0.framesize(csi.VGA) # 高分辨率
csi0.window((640, 80)) #取中间的640*80区域
The format of roi is (x, y, w, h). See using statistics
Set flip
csi0.hmirror(True)\ Horizontal flip
csi0.vflip(True)\ Vertical flip
For more sensor settings, see the official Chinese documentation of OpenMV: https://docs.singtown.com/micropython/zh/latest/openmvcam/library/omv.csi.html